10-Minute Work Makeup: The Routine and 4 Product Picks
By URITRIP

This article contains affiliate links. We may earn a commission on qualifying purchases made through these links. Product options, availability and shipping destinations vary by store.
A good 10-minute work makeup routine starts with deciding what “done” looks like. An even-looking base, a few gaps filled in your brows, and a little color on your cheeks and lips can be enough to pull your everyday look together. Try to squeeze in your usual contour and a full lash routine as well, and even quick hands can run out of time. The real time-saver is an order that leaves you with less to fix.
First, be clear about what those 10 minutes cover. Cleansing, moisturizing and applying sunscreen take their own time. Allowing around 10 minutes for makeup after skin prep is a more realistic starting point; false lashes or detailed concealing will need extra room. Instead of trying to hit the timer perfectly on day one, keep the steps that make the biggest difference to you.
These four product picks were chosen using official product information and the job each one can do in the routine. You do not need all four. If you already have products you love, use the suggestions to fill any gaps.
Start with your base and brows
For a workday routine, give your base the first share of your time. Patchiness on the cheeks or makeup collecting around the nose can stand out, and adding more color will not necessarily make the finish look more polished. A lighter level of coverage can still look put together when the edges of your base are blended and your brows look tidy.
Try this schedule after moisturizer and sunscreen. It is a guide to where you might spend your time, rather than a routine that has been timed and guaranteed to take exactly 10 minutes.
| Time | Step | When to move on |
|---|---|---|
| About 3 minutes | A light base and concealer where needed | Your base blends naturally across the face |
| About 1 minute | Targeted powder and brows | Unwanted shine and visible brow gaps are dealt with |
| About 3 minutes | One or two shadows and optional eye definition | There are no harsh edges when your eyes are open |
| About 2 minutes | Blush and lip color | Your cheek and lip colors work together |
| About 1 minute | A final check in good light | No obvious buildup along the jaw, around the nose or at the lip line |
If brows take you longer, borrow time from your eye makeup. If your brows are naturally full, brushing them into place and filling a sparse tail may be enough. A personal schedule is more useful than a universal one: notice which step you tend to wipe off and redo.
Keep skin prep compatible with your makeup
You do not need to use an exfoliating pad or exfoliant every morning to get a smooth base. Depending on your skin and the formula, exfoliation can irritate; rubbing harder or using it more often may lead to redness or stinging. Makeup catching on dry patches is not a reason to automatically exfoliate again that morning.
If your skin feels sensitive or is already peeling, keep prep simple with moisturizers you know you tolerate. Trying a new exfoliant and a new base together makes it harder to tell what caused irritation or pilling. A rushed morning is a good time to stick with combinations you already know.
The basic order is cleanse, moisturize as needed, apply sunscreen, then move on to makeup. Use enough moisturizer to keep your skin comfortable; dry skin does not automatically need less cream. If product is still sitting on the surface, pause before adding another layer. Use that moment to lay out your makeup and tools.
Sunscreen is not the step to cut back on to save time. Choose broad-spectrum protection against UVA and UVB with SPF 30 or higher, and follow the amount and directions on the label. The American Academy of Dermatology advises applying sunscreen about 15 minutes before going outdoors. A light layer of foundation and an under-applied sunscreen are two different things.
Choose a foundation-free base or a light layer of foundation

Going foundation-free does not have to mean wearing no base at all. A tinted sunscreen with concealer just where you want it is one option. It can suit days when you want a light finish and do not have much unevenness to cover. But if the tint clashes with your face and neck, or leaves you wanting more coverage, there is no need to force it.
For this approach, consider d’Alba Waterfull Tone-Up Sun Cream in Natural Cover Beige. It is a tinted sunscreen option for combining sun protection with a more even-looking complexion. Start by checking whether the beige tint blends naturally with your face and neck. Use the directed amount for sun protection, then spot-conceal if needed, rather than repeatedly adding sunscreen just to build coverage.
View d’Alba Cover Beige (Double Pack) at OLIVE YOUNG Global The linked listing is a 50ml double pack; check stock and shade options before ordering.
If you want to even out redness or discoloration over a larger area, a thin layer of foundation may be the quicker route. One pass over the face can take less work than blending concealer in lots of separate spots. Choose the approach that gets you to your preferred coverage with the fewest steps.
ABOUT_TONE Skin Layer Fit Foundation is the foundation option in this edit. Its role is to give you an alternative way to even out the whole face with one base product; it is not a required extra layer over the d’Alba sunscreen. Rather than copying someone else’s shade number, test a little along your jaw to see how it meets your neck, and check how it wears on your drier and oilier areas.
View ABOUT_TONE Foundation at OLIVE YOUNG Global
Start with a small amount of foundation, blend it out, and see where you actually need more. Work from the center of the face outward, paying attention to the sides of the nose and jawline. Use the broad side of your sponge for the cheeks and an edge for smaller areas around the nostrils to avoid switching tools unnecessarily.
A couple of blemishes do not need a thick layer over the surrounding skin. Place concealer on the spot, then gently blend its edges. For dark circles, try targeting the shadowed areas rather than brightening the entire under-eye heavily. Aiming to soften the contrast with nearby skin makes it easier to know when to stop.
Mixing a primer or prep base into foundation is an option, but it is not a shortcut everyone needs. Mixing can change the shade, coverage and finish, so familiar products used on their own make a useful starting point. In particular, do not assume sunscreen mixed with another product retains its labeled protection. Apply it as its own step according to the directions.
Powder selectively, then fill only the brow gaps
Instead of making the whole face equally matte, start with a little powder wherever shine bothers you. If your nose and forehead get oily while your cheeks feel dry, they do not need the same amount. Pick up powder with a puff or brush, tap off the excess, and apply lightly where needed.
Separate reshaping your brows from simply filling them in. For a quick morning routine, brush the hairs into place first so you can see the gaps. Fill the sparse tail and middle, then use what is left on your tool to soften the front. Starting with a heavy block of color at the front can leave you spending longer trying to balance both sides.
Your brows do not have to be perfectly identical. Alternate between a close look and stepping back from the mirror. Tiny differences become much more noticeable up close; what matters for the overall look is a thickness and depth of color that sit comfortably with your features.
Keep eye makeup simple and blend with your eyes open
A light base shade and one medium shade for definition are enough to start with. Sweep on a little color, open your eyes to check what is visible, then add depth only where you want it. Spend your time softening harsh edges rather than trying to use every shade in the palette.
Eyeliner is optional. If a little shadow at the outer corner gives you the finish you want, stop there. For extra definition, try a short line at the outer corner before attempting a long, thick wing. Rushed tightlining does not need to be part of a basic quick routine. Use products intended for the eye area and take care to keep them off the surface of the eye.
False lashes can work if you are confident applying them, but they are not an essential part of a beginner’s 10-minute face. Adjusting the placement and balancing both sides can take longer than expected. Your usual mascara—or skipping lashes altogether—is a valid finish. Follow the intended use and directions for lash adhesives, and stop if irritation occurs.
Keeping your eye and cheek colors in a similar family can simplify the look. Only use blush around the eyes if the product is suitable for that area, though. A flattering color is not a guarantee that a formula is appropriate everywhere. An eyeshadow in a similar tone is another way to coordinate.
Give cheeks and lips one clear color direction
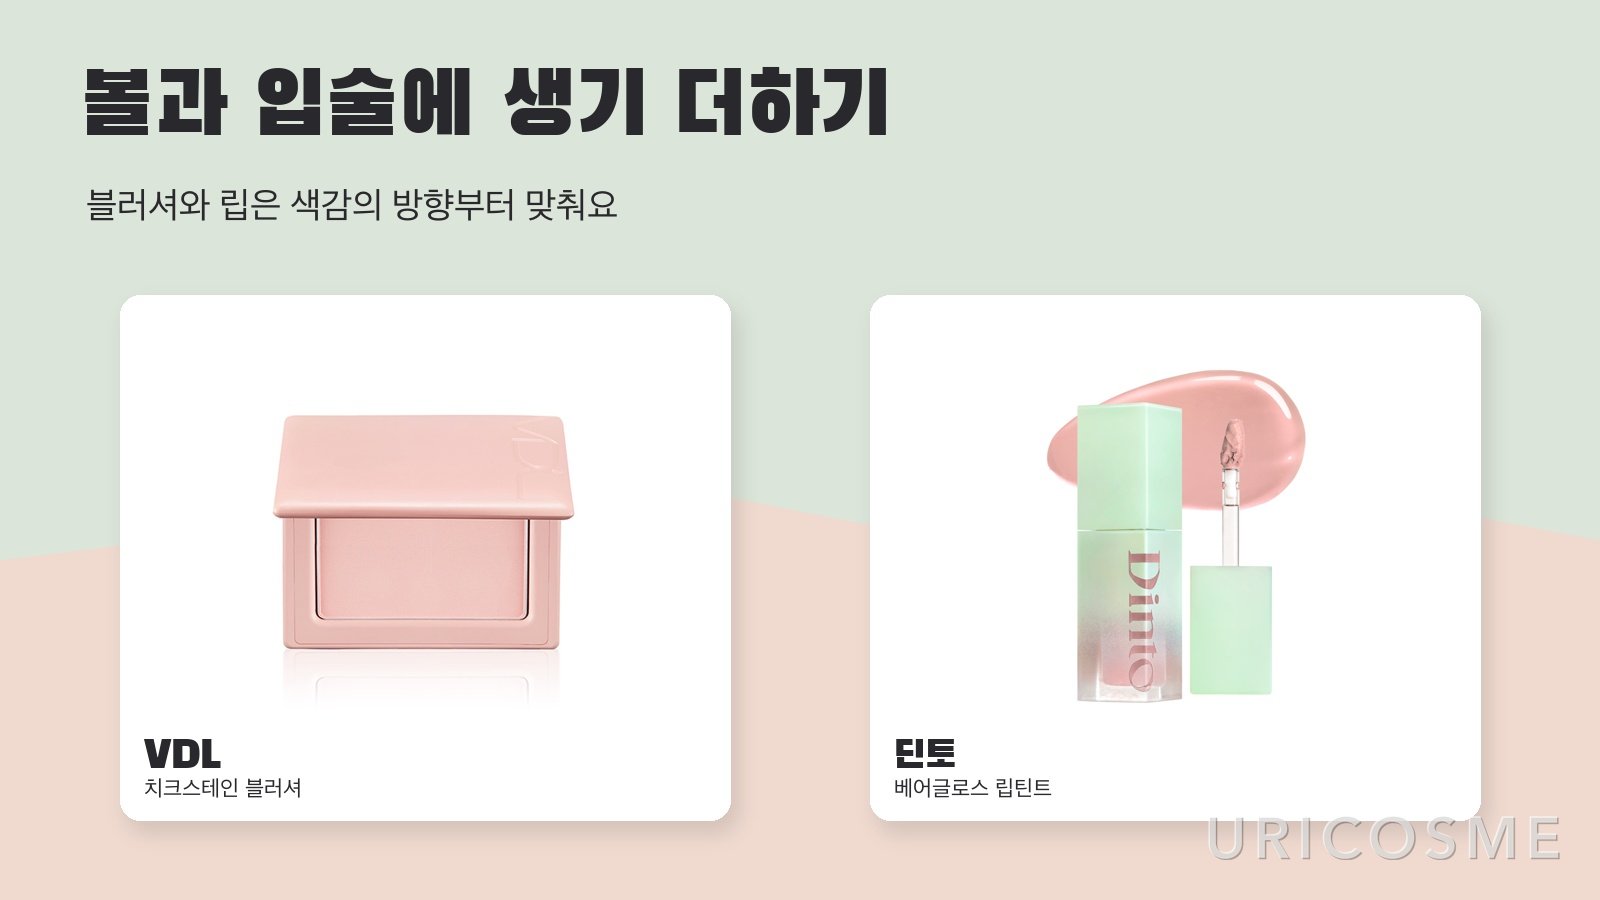
You do not need a complicated cheek-and-lip pairing every morning. Pick a direction, such as a muted pink or soft peach, then adjust the intensity. Start with a little blush and reassess after applying your lip color. A stronger lip may need only a hint of color on the cheeks.
VDL Cheekstain Blusher is the cheek option here. The product photo shows 01 Bouncing Peach, a shade to consider for a peach-toned look. Build it in small amounts for work rather than applying a lot at once. Check how a powder blush sits on dry areas, and treat this as a cheek product unless its suitability for use around the eyes has been confirmed.
View VDL Cheekstain Blusher at OLIVE YOUNG Global
Layering a lip base, tint and gloss can give you more control over color and shine. On a busy morning, though, one product that works with your natural lip color can be enough. If redrawing your lip line or building several layers takes you a while, simplify that part of your workday routine first.
Dinto Bare-Gloss Lip Tint is the pick for a glossy finish. Consider it if you would like to skip a separate gloss. A sheer wash of color and enough coverage to mask your natural lip color are different goals, so check swatches if your lips are naturally quite pigmented. The image represents the product line; it is not a shade-specific swatch.
View Dinto Bare-Gloss Lip Tint at OLIVE YOUNG Global
Use the same thinking for contour and highlighter. Keep nose contour if it is familiar and quick; leave it out if finding the placement takes you ages. These steps can add polish to a simple look, but they do not need to take priority over your base and brows.
Set a stopping point before the morning rush
Keep your everyday work makeup separate from products you save for special occasions. Group a familiar base, any concealer you need, a brow product, a small eyeshadow selection, blush and lip color in one place, and keep your tools clean. Having everything in the same spot cuts down on searching and choosing.
For your last check, step back from the mirror and look at the match along your jaw, any buildup around your nose, the depth of your brows and your lip line. Starting another round of concealing every small mark can easily derail your plan. A naturally blended base, tidy brows and cheek and lip colors that work together are a useful point to call it done.
A good 10-minute routine is not measured by how many products or trends it includes. It is about finishing the steps that matter to you and knowing which one to drop when time is tight. Decide on those priorities in advance—keeping your base while leaving out a fiddly lash step, for example—and you will know where to start even on a rushed morning.